
Expense reports make it easier to record expenses that a reporting person has paid in cash (or with a personal bank card) on behalf of the company.
Expenses paid from the company’s cash register can also be entered here, but these should be entered on a separate report to allow accurate tracking of the company’s own funds.
Expense documents paid with the company’s bank card should still be entered under purchase invoices so that the payments can be matched with bank transactions on time.
The reporting person does not need to be listed in the employee register (e.g., a board member who makes purchases with their own money but doesn’t get paid by the company and is not in the employee register). Their details are added to the partner register.
The company should decide how often expense reports are submitted, making sure the documents are recorded in the correct period (weekly or monthly).
When the expense report is saved, a payable/liability to the reporting person is created. There is no liability for suppliers and these expense documents do not show up in the purchase ledger.
The expense report can be found under Operations in the Expense and travel reports section.

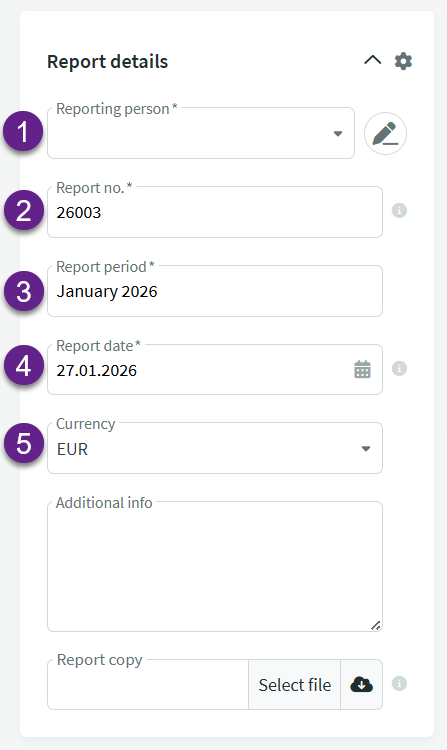
- Reporting person – add a new reporting person or select a name from the list. To add a new reporting person, only the name is required, other details are optional. You can later update the reporting person’s profile with bank account details.
- Report no. – expense reports are numbered according to a numbering formula, which can be configured under Settings -> Environment Settings -> Expense report numbering formula .
- Report period – by default this field is filled with the current month and year, but you can overwrite it with your preferred data.
- Report date – by default the report entry date is set to the current date, but you can select a suitable date.
- Currency – If the expense documents are in a currency other than euros, you can change the currency used in the report here. There is no need to convert the documents to euros beforehand.
Note: this setting applies to the entire report. Create separate reports for documents in euros and in other currencies. The required must be activated beforehand.
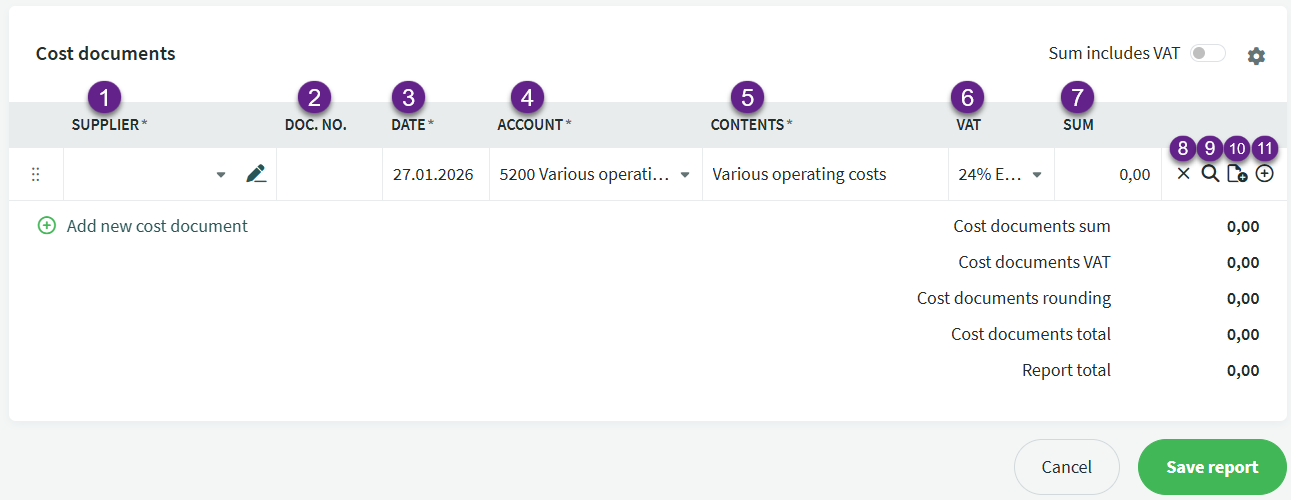
- Supplier – select an existing supplier or add a new one. If the selected supplier has a predefined cost account and VAT type, these will be automatically applied to the line.
- Doc. no. – number of the purchase receipt.
- Date – the date of the purchase receipt.
- Account – select the appropriate cost account for the line.
- Contents – by default, the name of the selected cost account is displayed here. You can overwrite this if needed.
- VAT – select the applicable VAT type. The default is 24% Estonia.
- Sum – the amount of the line excluding VAT.
- Cross – click to delete the expense document.
- Magnifying glass – click to view the total amount and VAT of the expense document, and to apply rounding if necessary.
- Document plus icon – click to upload a file of the expense document. Once a file is added, a green dot appears next to the paperclip.
- Plus sign – click to add an additional line to the expense document. Use this when a single document includes expenses of different types or VAT rates.
To add a new expense document, click on the line and select + Add new cost document.
Below the report lines, you will see the net amount (excluding VAT), the total VAT amount, and the total expense report amount.
Once the existing documents are entered, save the report by clicking the Save Report button.
The expense report can also be entered with VAT-inclusive amounts. To enable this, change the Sum includes VAT option from No to Yes. Please note that this setting applies to the entire report, not to individual lines.
When marking the expense report as paid, you can directly link it to the prepayment. If the prepayment amount does not cover the full amount of the expense report, you can add additional payment.
Payments related to the reporting person can also be handled during the import of bank transactions.
For additional questions, please write to us at support@simplbooks.ee
Leave A Comment?